In today’s digital age, record moments on your iPhone’s screen has become a crucial skill. Whether you want to show off a high score in your favorite game, to create a tutorial or save a memorable video call, screen recording on your iPhone can be a handy tool. In this guide, we’ll show you the simple steps to screen record on your iPhone.
Getting Started: Preparing Your iPhone
Before we get into the step-by-step instructions, make sure you’ve got everything set up:
1. Update Your iPhone:
Ensure your iPhone is running the latest iOS version. You can check this by going to ‘Settings’ > ‘General’ > ‘Software Update.’
2. Customize Control Center:
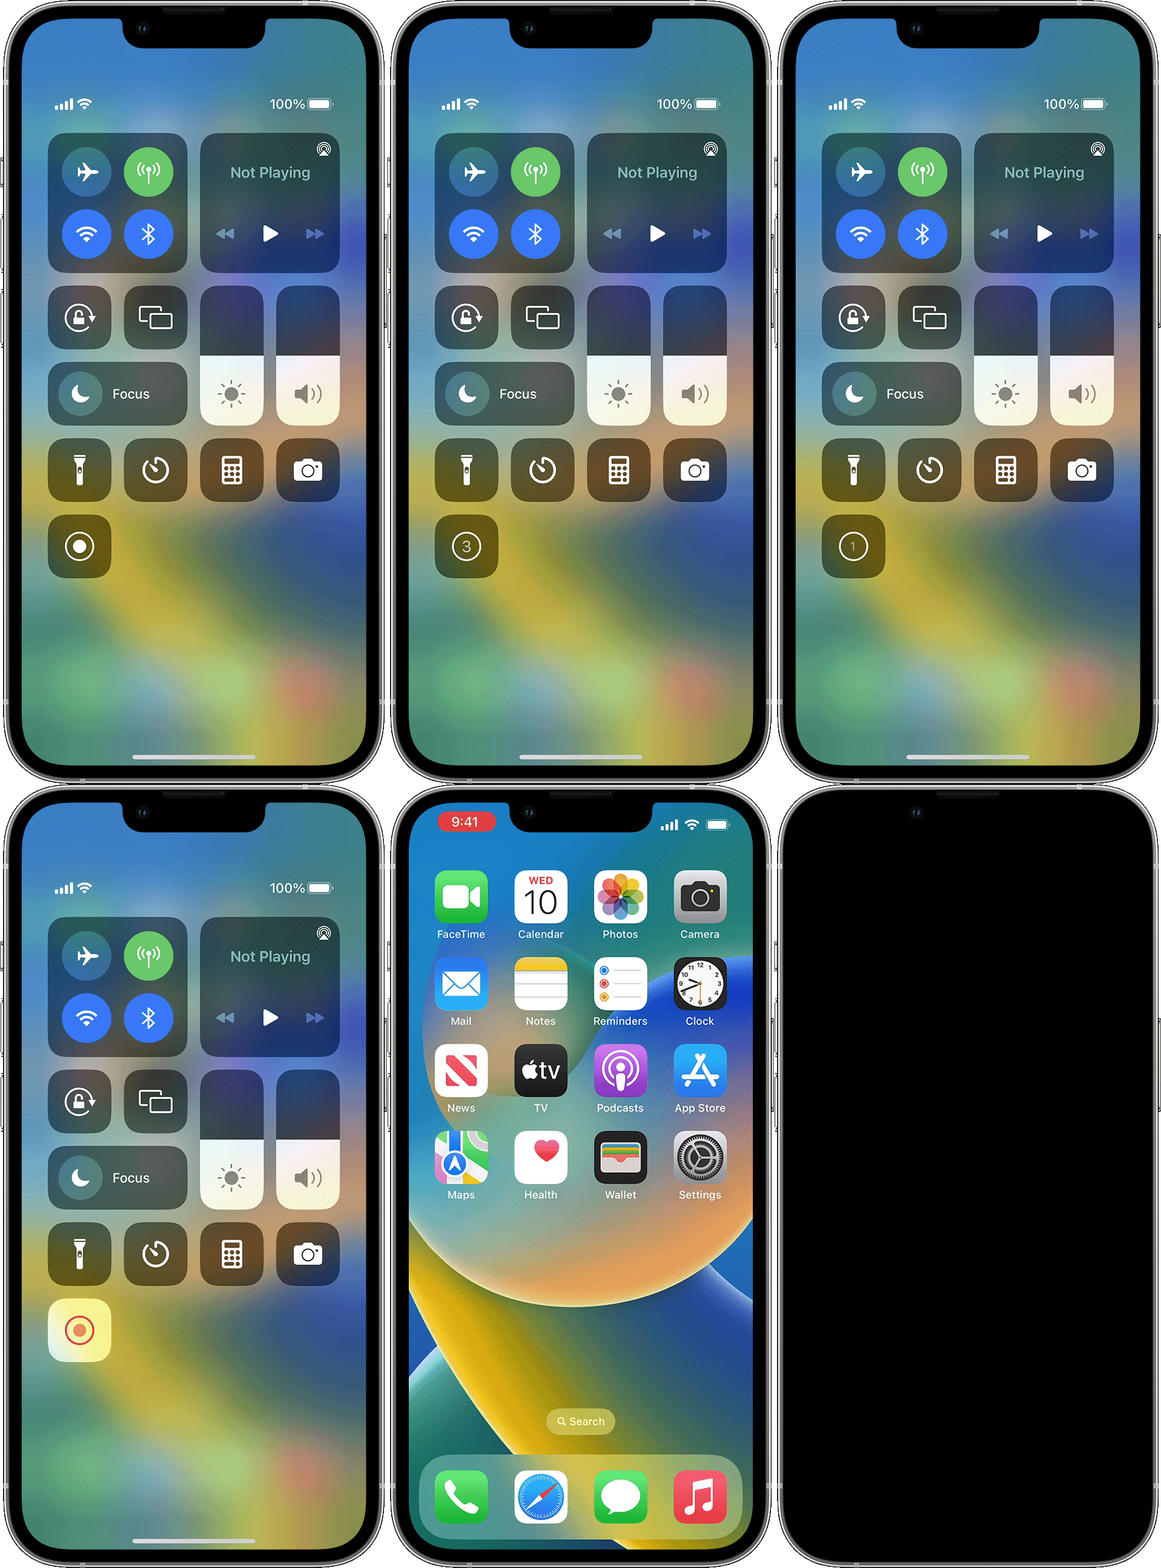
You’ll need easy access to the screen recording feature via Control Center. To enable it, go to ‘Settings’ > ‘Control Center’ > ‘Customize Controls,’ and add ‘Screen Recording’ if it’s not already in your Control Center.
Step-by-Step Guide to Screen Recording on iPhone:
Now that you’ve prepared your iPhone, here’s how to screen record:
1. Open Control Center:
Swipe down from the upper-right corner (iPhone X and later) or swipe up from the bottom (iPhone 8 and earlier) to open Control Center.
2. Activate Screen Recording:
In Control Center, look for the ‘Screen Recording’ button – it looks like a circle with a dot inside it. Tap on it.

3. Customize Settings (Optional):
You can customize settings such as enabling or disabling microphone audio for narration during recording. To do this, long-press or 3D Touch the ‘Screen Recording’ button.
4. Start Recording:
To start recording, simply tap the ‘Start Recording’ button. A countdown will appear, and your screen recording will begin.
5. Stop Recording:
To stop the recording, tap the red status bar at the top of your screen, or open Control Center and tap the ‘Screen Recording’ button again. Confirm your action by tapping ‘Stop.’
6. Access Your Recording:
Your screen recording is now saved in the Photos app under the ‘Videos’ album.
7. Edit and Share:
If needed, you can edit your recording using the built-in editing tools in the Photos app. Afterward, share it with friends or on social media to showcase your content.
Why Screen Record on iPhone?
After we start the ‘how,’ let’s briefly explore the ‘why.’ Screen recording can be a valuable feature for various purposes:
1. To Create Tutorials: If you’re an educator or content creator, you can use screen recording to demonstrate processes or teach others how to use specific apps.
2. To Show Off Your Achievements: Gamers can record their gameplay to share their victories or funny moments with friends or a wider audience on platforms like YouTube or social media.
3. To Capture Video Calls: Screen recording allows you to save video calls with loved ones for future memories or to share special moments.
4. To Show Document Software Issues: If you encounter a bug or issue with an app, recording the problem can be useful for troubleshooting or contacting customer support.
Tips for Successful Screen Recording on Iphone:
– Ensure you have enough storage space on your iPhone, as screen recordings can take up a significant amount of space.
– Record in a quiet environment for better audio quality.
– Practice a few test recordings to get comfortable with the process.
– Keep your screen clean to avoid distractions in your recording.
Screen recording on your iPhone is a versatile tool that can be used for various purposes. With this step-by-step guide, you can start capturing and sharing your screen moments effortlessly. Whether you’re a teacher, gamer, or simply want to document special memories, screen recording on your iPhone is a valuable feature that’s easy to use.
